Showing posts with label photography. Show all posts

Monday, 2 April 2012

Energy Use

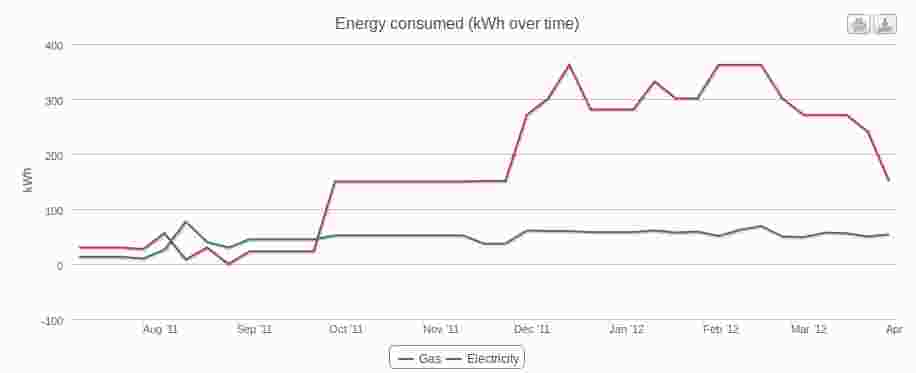
I've been using iMeasure roughly since I moved into the new house and here's what the graphs look like so far:

iMeasure Energy Usage Graph

iMeasure Energy Usage Graph

There are two immediate observations on this graph:

  • electricity use is not seasonnal,
  • gas use definitely is!

The first observation tells me that my main electricity usage is probably not lighting as it doesn't change with the amount of daylight. So it's probably down to the big electrical items such as the washing machine and the fridge. I should be able to reduce that usage the day I replace them with new efficient models. One additional tidbit of trivia: the spike at the beginning of the graph is down to the sanding machines used when I had the wooden floors of the house sanded and varnished.

The second observation tells me that I need to work on insulating the house. In fact, I had thermal imaging done recently by the excellent Sustainable Lifestyles and it showed me very clearly that I have some low hanging fruit to pick first, in particular the loft insulation (or partial lack thereof) that results in very cold spots above the bay window in the master bedroom:

Cold Spot Above Bay Window

Cold Spot Above Bay Window

And at the junction points between walls and roof, the fact that whoever fitted the insulation in the loft didn't bother to fit it properly at the bottom causes cold spots underneath:

Cold Spots Where Wall Meets Roof

Cold Spots Where Wall Meets Roof

All this should be reasonably easy to fix so that will be my project for the summer and hopefully it should shave some of that spike off the graph for next year.

Wednesday, 27 May 2009

Selective Colouring with ImageMagick

Following a recent Photojojo newsletter, I thought I would do some experimentation with black and white. But rather than use Photoshop or GIMP, I decided to use ImageMagick: the command line may seem like more effort at first but it gives more control and you can also put everything in a script for later re-use.

Choosing a good photograph

There are some photographs that come out great as black and white, others that don't. Generally, the best candidates are the ones that look a bit uninteresting in colour, generally because there isn't much colour in them to start with. It's easy to get that sort of shots in London: just go out on a cloudy day and you'll get likely candidates. And so, I shot this picture on Sunday afternoon while on the South Bank:

The Globe Theatre

Although the building is nice, the picture itself is quite dull: there is little colour in it apart from the red flags so it's an ideal candidate for black and white treatment.

Separating the channels

Following the Photojojo article, rather than transform that photograph into grey scale, I started by separating the red, green and blue channels, which is very easy to do with ImageMagick:

$ convert img.jpg -separate img_rgb_%d.jpg

Assuming your original image is called img.jpg, this will produce three images called img_rgb_0.jpg, img_rgb_1.jpg and img_rgb_2.jpg that correspond to the red, green and blue channels respectively:

Red, green and blue channels

The last one, the blue channel, is the best black and white in my opinion as it's got the strongest shadows and lightest sky. Having said that, the red flags in the original photograph were the main spots of bright colour and it would be interesting to bring them back in the black and white shot through selective colouring. So let's do that.

Creating a mask

To selectively colour the flags red in the black and white picture, I am going to combine the original shot with the blue channel image. For this, I need to create a mask that will tell ImageMagick what part of the original shot to use and what part of the blue channel image to use. For the mask, I need a black and white picture that is white where the flags are and black everywhere else: this way, I can tell ImageMagick to use pixels from the original image where the mask is white and pixels from the blue channel image where the mask is black.

Because the flags are red, the idea is to find all the pixels in the original image that are red and no other colour. We can do that by combining the three channel images. Pixels that are a shade of grey, anywhere between black and white will show as the same shade of grey on all three channels but pixels that are of a specific colour, such as red, will be of a light grey in their primary channel and very dark in the other two. Indeed, if you look at the three channel images, the flags show as very light in the red channel but nearly black in the other two. So to create our mask, we can subtract the green and blue channels from the red one.

First, let's subtract the green channel from the red one:

$ convert img_rgb_1.jpg img_rgb_0.jpg -compose minus \
 -composite img_rgb_0-1.jpg

Which produces the following image:

Green channel subtracted from the red one

We can already see the flags pop out of the picture but we can also still see the outline of the theatre. So let's subtract the blue channel from the image we just obtained:

$ convert img_rgb_2.jpg img_rgb_0-1.jpg -compose minus \
 -composite img_rgb_0-1-2.jpg

Green and blue channels subtracted from the red one

That looks good, except that the flags are now light grey rather than really white. It is still a good mask but as the grey pixels will mix both images we use, it will dilute the effect. To ensure that we have a full effect, we need to stretch the contract of the mask to have the background area really black and the flags area really white.

$ convert img_rgb_0-1-2.jpg -level 10%,30% img_mask.jpg

The values given after the -level option specify the percentage of white under which a pixel is considered black first followed by the percentage of white over which a pixel is considered white. There is no real perfect value for those so you need to experiment. In this example, the second value is quite low because we really want most grey pixels to be turned white for a sharp mask.

Stretched mask

You will note that there are some small dots of white at the bottom of the mask. That's slightly unexpected but we'll see in a minute what they are.

Creating the final picture

Now that we have a mask, we need to combine the blue channel image with the original image by applying the mask. This is the simplest use of the -composite operator:

$ convert img_rgb_2.jpg img.jpg img_mask.jpg \
 -composite img_final.jpg

This produces the final image. We can now see that the small dots of white at the bottom of the mask have let out some of the colour of the red flowers on the lamppost, which is a nice extra touch and which would have been forgotten had we created the mask by hand with a drawing tool. Such side effects are typical of such a tool that works on the whole image and can be welcome or not depending on the situation. In any way, it is always possible to tweak the mask manually in a drawing tool before applying it.

Final image

Bootnote

The photo in its original size is now visible on flickr.
Monday, 25 May 2009

Photos from Peru

I came back from Peru a week ago and spent a good part of last week tweaking and cleaning the best of them. They are now visible on flickr. The tweaking and cleaning I do on photos is very simple and consists in:

  • stretching the contrast if required;
  • removing fluff and dirt mark left on the lens or the sensor;
  • very occasionally, cropping the shot.

So no heavy Photoshop (or in that instance GIMP) processing, just the bare minimum.

Sunday, 1 February 2009

Canon and Linux, part 4

For the background to this post, see part 1, part 2 and part 3.

Having had no news from Canon for nearly a month, I was about to send them another message when I received the following email from their helpdesk:

Recently you placed a Support Request with Canon Support Centre.

To ensure you received the best possible service we would like to confirm that your request has been handled satisfactorily before it is closed. A description of your request follows:

Please use the following URL to confirm whether your service request is complete or still needs to be addressed: some long URL

YOU HAVE FIVE (5) DAYS IN WHICH TO RESPOND. IF THERE IS NO RESPONSE, YOUR REQUEST WILL AUTOMATICALLY BE CLOSED BY THE SYSTEM.

So I went to the URL provided and responded by saying that I had not had a reply at all and that my request was still open. I then received the following email the very next day:

Please find attached that latest firmware version for your EOS 5D (Version 1.1.1).

As requested I am sending it to you in a ZIP file as the EXE download is not suitable for your Linux operating system.

Please go to the following link where you can find instructions on how to upload the firmware to your camera.

http://web.canon.jp/imaging/eos5d/eos5d_firmware-e.html

Please take careful note to the End Users Licence agreement at the bottom of the page.

Also I would like to state that you have decided to take full responsibility for the installation of the firmware, and we have sent the firmware in this format knowing that you agreed to our conditions.

At last, I had a version of the firmware that I could unpack on Linux! It was then just a matter of following the instructions:

  1. Unpack the zip file and extract the .fir file that it contains;
  2. Format a memory card in the camera;
  3. Move the .fir file to the top directory of the newly formatted memory card;
  4. Insert the memory card back into the camera and upgrade the firmware.

All went without a hitch. Considering that the only reason a computer is needed in order to upgrade the firmware is to copy the .fir file to the memory card unmodified, Canon has no real software to write: any computer that can write to the memory card can do that. Therefore, I fail to see why Canon insist on providing versions of their firmware that can only be unpacked on Windows or Mac OS-X and why they go through such an effort to explicitly shift the responsibility of the upgrade to me because I use Linux. Well I suppose the reason they do this is to limit the number of variations they have to support in testing firmware upgrades. But surely, there is a better way to distribute firmware that would not require me to explicitly contact customer support for it.

Friday, 2 January 2009

Canon and Linux, part 3

For the background to this post, see part 1 and part 2.

I got an answer from Canon on Tuesday:

Dear Customer,

Thank you for your query regarding the Firmware update for your EOS 5D.

As the versions available for download are only compatible with Windows and Mac, we could produce a zipped up version of the .FIR file so that you can update your firmware on your Linux computer.

Please note that whilst we try our best to ensure the file we provide you with is virus free, you must install the firmware entirely at your own risk.

Could you please also confirm that you have an EOS 5D.

Some progress then. However, they ask me some more questions, to which I can give the answers but you can't reply directly to their support email address, you have to go through the standard form on the web site again. I did that and asked the following question:

Dear support,

Yes, I can confirm that I have an EOS 5D and I am happy to update the firmware at my own risks. Have Canon got any plans to offer a zip version of the firmware in the future in order to support all their customers equally?

So now I'm waiting for the next answer. This whole malarkey of going through the web form every time means that there are potentially 2 to 3 business days delay for the answer to each new question even if it relates to the same problem, which can potentially drag things out a lot, especially considering the web form is limited to 4000 characters!

Monday, 29 December 2008

Canon and Linux, part 2

5 days ago, I sent a complaint email to Canon about their lack of support for Linux (or any operating system other than Microsoft Windows or Apple OS-X) when it comes to upgrading the firmware of my camera. I received this standard email reply today:

Dear Customer,

Thank you for your recent enquiry regarding your Canon product.

Your query has been sent to the appropriate group and is currently under investigation.

Yours sincerely,

Canon Support Centre

Should our answer not fully resolve your problem, please feel free to either re-submit a new query by clicking here, or alternatively call our support helpdesk at 08705 143 723 Monday to Friday from 9:00AM to 5:30PM stating the 7 digit reference number in the subject of this email.

We aim to answer queries as soon as possible. Responses on average take 2 to 3 business days (or the next working day if submitting on a weekend or public holiday).

If I read between the lines, it looks like the Christmas period was out of hours so the average of 2 to 3 business days probably starts now.

Wednesday, 24 December 2008

Canon and Linux

I've now been the proud owner of a Canon EOS 5D for a few years. I've never upgraded the firmware on it but tonight I thought I would investigate how complicated it was. I easily found the corresponding web page on the Canon web site. It seems easy enough: you get a .fir file that you put in the root directory of a newly formatted memory card and you then follow the upgrade procedure on the camera. All easy and simple. The only snag is that you get two version of the firmware package: a self-extracting .exe file for Windows or a .dmg package file for Mac OS-X. Both those options are proprietary so they don't work on Linux. Therefore, there is no way I can upgrade my firmware using my laptop. I could use the Mac desktop at home but I am not home right now. Furthermore, it's not even a software problem, it's just a packaging problem: there is nothing in the .exe or the .dmg apart from the automated unpacking. It would be so easy for Canon to offer a simple .zip file that can be extracted on any operating system. By any means, provide the proprietary formats for people who will benefit from them but also provide a generic format that can be used anywhere. So here is the complaint I registered on the Canon UK support site:

You offer firmware download on the Japanese site (http://web.canon.jp/imaging/eos5d/eos5d_firmware-e.html). Unfortunately, you only provide proprietary Windows and Mac packages. Using a Linux laptop, I cannot use those formats. If you were to offer a simple ZIP file for all other operating systems, it would enable all your users to update their firmware. As such, I feel treated like a second class citizen by Canon and it is very disappointing. I am happy to take complete responsibility for updating the firmware from a Linux machine but I would like to be given the option. Is there any way I can download a version of the latest firmware that can be extracted on Linux? If yes I would appreciate if you could provide me with the details of such a download.

We shall see if anything comes out of it. They promised to come back to me within 2 to 3 days. Then I went and filed a second complaint because their web site crashes when I try to log into it as a registered Canon customer but that's a whole different story.

Monday, 23 June 2008

Pixel Lapse

I recently came across this small application called pixel-lapse. The basic principle sounds interesting: record a webcam image one pixel at a time. From the photo gallery on the web site, it looks like you get the most interesting results when part of the image is static and part of it moves. So I decided to give it a go and here's the first shot:

Pixel Lapse image

Working at the computer

Interesting result indeed! Shame about the watermark though. I'd happily pay a few quid for a version without the watermark but it doesn't seem to be an option on the web site.

Saturday, 29 December 2007

Photographic Metadata

When I first started with an SLR camera, some 13 years ago, all camera magazines had the same advice for beginners: to improve your pictures, write down all the settings you used, such as aperture or shutter speed, so that you can go back to this information once you have the prints and understand why they came out the way they did. As a result, a serious photographer would always have a small notebook with him to write all this down. It was quite a time consuming process but essential for who wanted to improve. In this age of digital photography, it would seem sensible for the camera to store this information with the picture so that you can retrieve it later. And indeed they do, in metadata called EXIF data that is embedded in the image file. Software like Photoshop is able to read EXIF data but it's a bit overkill to fire Photoshop just to look at this data. And it would also be nice to be able to write scripts based on it, such as a script that selects all pictures taken at a particular focal length.

Such a tool exists: it's called, quite simply, ExifTool. The tool is written in Perl so should work on any system that has Perl installed. There is a package for Mac OS-X that makes it really trivial to install. A proper install on Linux is slightly more convoluted so here's how to do it on Ubuntu:

  1. Download the latest version from the web site, in my case version 7.08;
  2. Extract the content of the file:
    $ tar -xzf ./Image-ExifTool-7.08.tar.gz
    
  3. Install the Perl libraries so that they can be used by other Perl scripts:
    $ cd ./Image-ExifTool-7.08
    $ perl Makefile.PL
    $ make
    $ make test
    $ sudo make install
    
  4. Install the main script:
    $ sudo cp exiftool /usr/local/bin
    

Alternatively, you can use ExifTool directly from the directory where you extracted it if you just want to try it out. Using ExifTool in the command line is very easy, just call:

$ exiftool myfile.jpg

And it will output all the metadata tags it knows about. There are a number of options available, in particular, you can select what tags you want to see. It's all very well explained in the man page. And if you run exiftool without arguments, it will actually display said man page. So what sort of fun stuff can we do now? Here is an example that selects all the files with a .JPG extension in the current directory and below that are photographs taken with a focal length of 105mm:

$ for f in `find . -name "*.JPG"`; do
> if [ -n "`exiftool -FocalLength $f | grep '105.0mm'`" ]; then
> echo $f
> fi
> done

Note that ExifTool formats its output such that it prints out the name of the tag followed by a colon and the value. If you want to strip that name and only keep the value, you can do something like this:

$ exiftool -FocalLength myfile.jpg | sed 's/^[^:]*: //'

An interesting application, if you have a GPS receiver is to combine the GPS trace log with the EXIF time information to geo-tag your photographs. There are a number of links on the ExifTool web site that point to such utilities. Once geo-tagged, online photo sites like flickr will use this information to position the pictures on a map. Or more simply, to come back to what I was talking about at the beginning of this article, you could compare basic shot settings between pictures to understand why one is better than another.

Note that there are other tools than ExifTool to do this, some of them offer a graphic front-end that may be easier to use for those who are not comfortable with the command line, but ExifTool is by far the most complete and powerful. Just google for exif reader if you want to find other options.

Saturday, 30 June 2007

Cryptic Codes and Canon Lenses

As I have enough camera gear that a standard travel insurance will not cover it, I bought a special insurance just for the camera and associated bits and pieces. They require that I provide serial numbers for every item that is worth more than £200. So when I recently acquired a new EF 15mm f/2.8 Fisheye lens, I decided to add it to the insurance policy and went in search of the serial number. On the box, there is a sticker that specifies a serial number but, at first sight, it looks nothing like any of the codes on the lens itself. To start with, the lens has two codes: a numeric one and an alphanumeric one. Which one is the right one? After some digging on the net, I had the answer, so here's an illustration of it, with a couple of my lenses.

The numeric code is the actual serial number. On the EF 15mm f/2.8 Fisheye lens, it is located on the barrel, near the camera mount. On the EF24-105mm f/4 L IS USM lens, it is located on the bayonet flange.

Serial number on the barrel of the EF15mm f/2.8 Fisheye lens Serial number on the bayonet of the EF24-105mm f/4 L IS USM lens

Serial number on the EF15mm f/2.8 Fisheye and the EF24-105mm f/4 L IS USM

That same number is also available on the box the lens came in. On that box, there is a sticker with a bar code and a couple of numeric codes, with the title Lens No. At first sight, none of the codes on the sticker seem to really match what's on the lens. But looking closer, it appears that the serial number is the end part of the bottom code. It all makes sense now! What the other codes mean, I don't have the faintest idea.

Lens No sticker with serial number circled

Lens No sticker with circled serial number

I also found an explanation for the alphanumeric code that can be found on the lens. This is a manufacturing code. My fish-eye lens has a code that says UV0509.

  • The first letter, U, identifies the factory that produced the lens: Utsunomiya, in Japan.
  • The second letter, V identifies the year the lens was manufactured: 2007.
  • The following two digits identify the month the lens was manufactured: May.
  • The last two digits are an internal Canon batch number.
This manufacturing code enables Canon to identify a batch of lenses. For example, the first batches of the EF24-105mm f/4 L IS USM lens had an optical defect that produced serious flares. This code on the lens enabled owners to identify whether their lenses were part of any defective batch so that they could return it to Canon.

Manufacturing code on the EF15mm f/2.8 Fisheye lens

Manufacturing code on the EF15mm f/2.8 Fisheye

So there you go, that's what all those numbers mean on Canon lenses. I can now fill in my insurance policy properly.

Sunday, 17 June 2007

How to create a colour palette from a photograph using Photoshop

Following a talk by John Hicks at @media2007, I was wondering how to derive a colour palette from a photograph in Photoshop. As I am a real Photoshop novice, I started by searching through the help and eventually came to a technique that involving transforming the image to indexed colour mode, reducing the number of colours and creating a swatch library from the resulting image. The results were quite poor and it was very cumbersome to do. There had to be a better way.

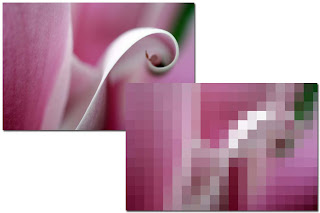
So I ditched the Photoshop manual and went googling. It took about 5 minutes to come up with the answer: pixelate the picture, as explained graphically on Upstart Blogger from the original article at YourTotalSite. Here is the result with one of my pictures:

Pixelated photograph to extract its colour palette

Pixelated photograph to extract its colour palette

The cool thing about this technique is that it is very fast and you can manipulate the resulting colour palette as an image. Of course, if you want to, you can always extract a swatch library out of it as you would have done in the original picture.

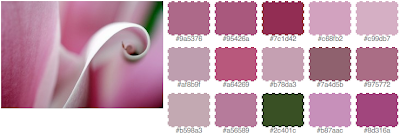
Update: Of course, as I had just published this article I had a brain wave and decided to check out fd's flickr toys. As you would expect, they have a palette generator that does exactly what it says on the tin and gives you a 15 colour palette with hexadecimal codes and an example CSS snippet.

Screenshot of fd's flickr toys palette generator output

Screenshot of fd's flickr toys palette generator output

Sunday, 24 September 2006

White Balance

Three images showing different white balance settings

Digital cameras have one very interesting advantage over good old film cameras: you can adjust settings that you would normally have adjusted by changing film. An obvious one is the ISO setting: one shot can be taken at 100 ASA, the next one at 400. A less obvious but very important setting is the white balance. This setting is meant to adjust the colour balance in different types of light so that white areas actually come out white. If you get the white balance wrong, the white areas in your shot will come out yellow or blue, depending which way you got it wrong.

Most DSLR cameras and some high end compact digital ones allow you to override the white balance, typically by offering a presets for tungsten or fluorescent light, cloudy or shade conditions, etc. But your specific lighting conditions don’t always match a preset. Some cameras allow you to provide a sun temperature equivalent in Kelvin but this is confusing if you are not an astronomer or a physicist. Finally some cameras allow you to specify a custom white balance by giving them a reference. I had never used this setting as I wasn’t too sure how it worked on my camera, until today when I picked up a copy of Mac User that has a very simple and straightforward explanation.

I decided that the subject for experimentation would be my bedroom, complete with unmade bed. Not that I want to pretend I am Tracey Emin but the wall behind my bed is the best white reference in my flat. To make my life easier, I composed the shot to ensure a large area of white wall would cover the centre of the image, as this is the area the camera will use as white reference.

  • The first picture is taken using the automatic white balance setting. Although the camera tried to compensate for the yellow hue produced by the tungsten light, it is still very yellow.
  • The second picture is taken with a preset white balance for tungsten light, which should be the right setting in this case. unfortunately, and probably because of the lamp shade that modifies the light, it is still quite yellow. Although, in this case, when seen on its own and in the original light, the mind adjusts and makes you think it is actually white.
  • The last picture was taken using the custom white balance seting and the previous picture as a reference. This time it is really white: I verified this by using the colour picker tool in Photoshop. The funny thing though is that seeing the shot on the camera’s LCD screen, on its own and just after the previous one, the mind plays tricks again and makes you think it is blue-ish.

Using a custom white balance produces great results. The only complication is that you have to take a reference shot and adjust the setting every time you change light condition but it is easier and quicker than doing that in Photoshop afterwards, especially if you take several shots in the same lighting conditions. Also note that, because it consists in comparing the balance of primary colours in a reference subject, this reference doesn’t have to be pure white, it can be light grey. So a photographic 18% grey card is an ideal reference object.

Tuesday, 19 September 2006

Nova 1

Less than £1000 to send a digital camera (nearly) into space and come back with more than 800 amazing pictures: this what a group of students from Cambridge recently did. This is beyond cool! Well done to the Nova 1 team! Beat that NASA!